The truth is, gardening is as much an art as it is a science. It’s about learning what works, making adjustments, and understanding that every season brings new lessons. Some techniques, like for example direct sowing, allow plants to take root right in the garden, while others, like soil blocking or using the perfect seed-starting mix, help young plants get a stronger start indoors.
In this guide, we’ll explore different methods for growing plants from seeds, from choosing the right containers to troubleshooting common issues like leggy seedlings and transplant shock. Whether you’re a beginner or a seasoned gardener, know that gardening is a process of trial, error, and discovery. The more you observe, experiment, and adjust, the better you’ll get at growing strong, resilient plants.

Direct Sowing: Planting Seeds Straight in the Garden
Instead of starting seeds indoors under grow lights and then transplanting them later, some plants thrive best when sown directly into garden soil. These seeds are naturally built to handle the elements, growing strong and deep without the stress of being moved. Many fast-growing vegetables, such as radishes, beans, peas, carrots, and leafy greens, prefer this method because they waste no time. As soon as conditions are right, they germinate quickly and establish strong roots. Larger-seeded crops like corn, melons, squash, and cucumbers also benefit from being planted directly in the garden, as their root systems develop more effectively without disruption. In addition to vegetables, many flowers and herbs flourish when direct sown. A great example of this is native plants and wildflowers, which follow nature’s cues and germinate at their own pace when sown directly into garden beds.
One of the greatest advantages of sowing seeds directly is that it eliminates the risk of transplant shock, allowing young plants to establish deep, resilient root systems from the very beginning. Plants started this way tend to be more drought-tolerant, better equipped to handle temperature fluctuations, and generally require less maintenance. For home gardeners, direct sowing also streamlines the seed-starting process, there’s no need for trays, artificial lighting, or the careful handling of delicate transplants. Simply plant the seeds, keep them moist, and let nature take care of the rest.

Of course, starting plants directly in the garden comes with challenges. Soil preparation is key, seeds won’t sprout well in compacted, weedy, or poor-quality soil. Before planting, loosen the top few inches with a rake or garden fork to create a soft, well-aerated seedbed. Some seeds, like lettuce and carrots, require light to germinate, so they should be pressed gently onto the surface of the soil rather than buried too deeply. Covering these seeds too heavily is a common mistake that can lead to spotty or failed germination.
Timing is just as important as soil prep. Some plants tolerate cool weather and can be sown as soon as the ground is workable, peas, spinach, and radishes actually prefer chilly soil and should be sown before the last frost. But warm-season crops, like squash, melons, and beans, require soil warmth to germinate. If planted too early, they may rot before sprouting.
Determining when to start depends on the seed package instructions, your local growing season, your growing zone, which dictates the average frost dates, and microclimates within your garden that might offer warmer or cooler conditions.
See the USDA Plant Hardiness Zone Map here.

Proper spacing is also essential. It’s tempting to scatter too many seeds at once, but overcrowding leads to weak, spindly plants that compete for nutrients and light. If seeds are too close together, thinning will be necessary later, this task that can be frustrating if you’re reluctant to remove healthy seedlings. The rule of thumb? Plant seeds at a depth twice their diameter, ensuring they have enough space to develop properly.
Once seeds are planted in the garden, consistent moisture is essential. If the soil dries out, seeds may fail to germinate or develop weakly. However, too much water can wash them away, especially the small ones sitting on the surface of the soil. A good trick is to moisten the soil before planting, this will ensure that newly planted seeds have immediate access to moisture. Afterward, keep the soil evenly damp using gentle watering or light mulch, such as straw or grass clippings, to retain moisture.

Perhaps the biggest downside to direct sowing is weed competition. Unlike starting seeds indoors, where seedlings get a head start in a controlled environment, direct-sown plants must immediately compete with weed seeds lurking in the soil. The best solution? Frequent weeding in the early stages or mulching lightly to suppress weeds while still allowing seedlings to push through.
Another challenge is pests, birds, slugs, and insects love feeding on tender sprouts the moment they appear. Covering new seed beds with netting, row covers, or light mulch can help protect young seedlings from being eaten.

Choosing the Best Seed-Starting Containers
If you’re starting seeds indoors, the container you choose can make all the difference. While it may seem like any small pot will do, different containers affect root development, moisture retention, and transplant success in unique ways. Some containers encourage strong root systems while others restrict growth or dry out too quickly. The best containers for seed starting should provide adequate drainage, allow proper root development, and prevent soil from staying too wet.

Soil Blocks
One of the most effective methods for starting seeds indoors is soil blocking. Unlike traditional plastic seed-starting trays, soil blocks eliminate the need for separate containers altogether. Instead, seedlings grow in free-standing cubes of soil, which are created using a soil blocker tool that compresses a special seed-starting mix into uniform blocks.
The biggest benefit? No root binding. In standard pots, roots hit the container walls and start circling, which can stunt growth. With soil blocks, roots naturally air prune themselves, preventing them from becoming tangled. When it’s time to transplant into the garden, the seedling and its soil block go straight into the ground without root disturbance, ensuring a smooth transition. Soil blocking works particularly well for tomatoes, peppers, and brassicas like kale and cabbage, all of which need strong root systems for healthy growth.
See the ultimate guide to seed starting with soil blocking here.

Seed Trays with Cells
Seed trays with individual cells are the go-to choice for many home gardeners because they’re neat, easy to organize, and make growing plants from seed more manageable. Each seed starter tray provides a dedicated space for each seed, making germination tracking and transplanting easier. Many seed starting trays also come with clear covers, which help retain moisture and create a humid environment that's ideal for germinating seeds.
However, these trays come with downsides. The biggest issue is root restriction, if seedlings aren’t transplanted into the garden at the right time, their roots can become root-bound inside the tiny cells. Fast-growing plants, like basil and lettuce, suffer the most if left in trays for too long, leading to stunted growth. To avoid this, it’s best to transplant seedlings into larger containers if they outgrow their cells before the weather allows them to move outdoors.

Another common challenge is moisture control. Thin trays tend to dry out quickly, which means they require frequent watering to keep seedlings from struggling. Small cells, in particular, can lose moisture within hours under grow lights, putting young seedlings at risk of wilting or dying before they have a chance to establish themselves. One of the best ways to maintain consistent hydration without overwatering is bottom watering, placing the tray in a shallow dish of water and allowing moisture to wick up from below. This method not only keeps seedlings evenly hydrated but also helps prevent damping off, a common fungal disease that can wipe out young plants before they even get started.

Egg Cartons & Yogurt Cups
If you’re looking for an inexpensive way to start seeds, repurposing egg cartons or yogurt cups can be a great option. These containers are readily available, and using them cuts down on waste while still providing a functional seed-starting environment. Egg cartons work particularly well for small seeds like lettuce, basil, or snapdragons, which don’t need much space to germinate.
However, these makeshift containers come with their own challenges. Drainage is the biggest issue, if there aren’t holes in the bottom, water can pool and lead to root rot. Always make sure to poke drainage holes in yogurt cups or the bottoms of egg carton cells before filling them with soil. Another drawback is that egg cartons dry out extremely fast because they’re made of thin, absorbent material. If using them, it’s important to keep a close eye on moisture levels and mist frequently to prevent drying out.
One additional tip: While egg cartons are great for germination, they aren’t ideal for long-term seedling growth. The cells are too small for developing root systems, so seedlings should be transplanted into larger containers once they’ve grown their first set of true leaves.

Biodegradable Pots
Biodegradable pots, such as peat pots, cow manure pots, and newspaper pots, are popular for starting plants that don’t like root disturbance. Instead of removing the plant from the pot at transplant time, the entire container is placed directly into the garden, where it gradually decomposes.
This is especially helpful for cucumbers, pumpkins, melons, and squash, all of which don’t handle root disturbance well. However, in practice, biodegradable pots don’t always break down quickly enough, and if the roots can’t penetrate the pot walls, seedlings can become stunted.
To improve success with biodegradable pots, try tearing off the bottom before planting to help roots escape. Also, thoroughly soak the pot before transplanting to encourage faster decomposition in the soil.

Gutter Gardening
Gutter gardening might sound unconventional, but it’s a practical and effective way to start shallow-rooted crops like peas, spinach, and lettuce. The process is simple: seeds are planted in a length of rain gutter filled with soil, and once the seedlings are strong enough, the entire row is slid into a prepared garden bed.
One of the biggest advantages of this method is that it minimizes transplant shock. Since seedlings remain in the same soil from start to finish, there’s no need to disturb delicate roots when moving them outdoors. This makes it especially useful for cool-season crops in early spring when garden soil might still be too cold or waterlogged to work with.
While highly effective, gutter gardening works best for plants that grow well in rows and have shallow root systems. It does require stable indoor or greenhouse space before transplanting, and proper drainage in the gutters is essential to prevent water from pooling. But for anyone looking to get a jump start on early greens or peas, it’s a creative, time-tested technique worth trying. Gardeners have always found innovative ways to maximize growing space, and this method is just another example of making the most of what’s available!

The Best Soil for Starting Seeds
The foundation of healthy seedlings begins with the right soil. While it may seem convenient to use garden soil or regular potting mix, both can actually hinder seedling growth. Garden soil is often too dense and compacted, making it difficult for delicate roots to push through. It also contains microorganisms that can introduce diseases and disrupt germination. Similarly, standard potting soil, which is designed for mature plants, tends to be too coarse and retains excessive moisture, creating conditions that may overwhelm fragile seedlings.
Unlike established plants that can extract nutrients from deeper soil layers, seedlings have fragile root systems that require a light, well-aerated, and moisture-balanced growing medium. Many commercial potting mixes contain bark, compost chunks, or large particles that are too rough for delicate roots, making it harder for young plants to establish themselves.
Additionally, these mixes often hold too much moisture, increasing the risk of root suffocation, damping off, or seed rot before sprouts even emerge. Because seedlings rely on the energy stored in their first leaves, called cotyledons, they do not require heavy nutrients in the early stages of growth. Many potting soils contain added fertilizers that can be too strong, leading to leggy growth or even root burn.

Instead, a proper seed-starting medium should be light and fluffy to allow easy root penetration, well-draining to prevent waterlogging, and moisture-retentive enough to keep seeds hydrated without becoming overly soggy. Sterility is also essential, as garden soil and unmodified potting soil often contain weed seeds, bacteria, and fungi that can harm young plants before they even have a chance to grow.
Many commercial seed-starting mixes are specifically designed to meet these requirements, making them a reliable choice for home gardeners. These mixes are free of large particles, provide the right balance of aeration and moisture retention, and create an ideal environment for successful germination. However, if potting soil is the only available option, it can be modified to better suit seedlings. Removing large particles creates a finer texture that won’t inhibit root growth. Adding perlite or sand improves drainage, preventing excess moisture buildup. Blending in coconut coir or peat moss enhances moisture retention while keeping the mix light and airy, providing young seedlings with the best possible start.

The Perfect Homemade Seed-Starting Mix
Over the years, we've experimented with different seed-starting soils, both store-bought and homemade. While commercial mixes are convenient, they often contain unnecessary fertilizers, moisture-retaining chemicals, or ingredients that compact too quickly, limiting airflow to delicate roots. After comparing store-bought mixes with DIY blends, and through trial and error, we've found that making a custom mix is not only simple and cost-effective but also allows complete control over the ingredients.
Here’s a tried-and-true recipe that has proven highly effective:
2 parts peat moss or coconut coir : This serves as the base of the mix and is excellent for moisture retention. Peat moss is the more traditional option, but for a more sustainable choice, coconut coir works just as well. Both materials are lightweight, help seedlings stay evenly hydrated, and allow roots to develop without becoming waterlogged.
1 part perlite or vermiculite : These volcanic minerals are key for improving aeration and drainage. Perlite enhances airflow and prevents soil from becoming too compact, while vermiculite retains a bit more moisture, very helpful in drier conditions. A combination of both works beautifully, striking the perfect balance between drainage and moisture retention.
1 part compost or worm castings : Though seedlings don’t require heavy feeding early on, a small amount of well-aged compost or worm castings provides gentle, natural nourishment. Sifting the compost ensures a fine texture, free of large particles, allowing for even distribution of nutrients and beneficial microbes that promote plant health.
The beauty of making a custom seed-starting mix is the ability to adjust it based on specific growing conditions. While commercial blends can work in a pinch, nothing beats the control and quality of a homemade mix.

Tips for Maintaining Healthy Seed-Starting Soil
Even with the perfect seed-starting mix, how you maintain the soil plays a huge role in whether your seedlings thrive or struggle. The right balance of airflow, cleanliness, and structure ensures that seedlings develop strong, disease-free root systems.
Good air circulation is essential. Stagnant, humid air creates the perfect environment for mold, mildew, and damping-off disease, which can wipe out an entire tray of seedlings overnight. To prevent this, make sure your seedlings are in a well-ventilated space, and consider placing a small fan on a low setting nearby to improve airflow and strengthen seedling stems. A gentle breeze mimics outdoor conditions and encourages sturdier growth.

If you plan to reuse soil from a previous season, it's important to sterilize it first to eliminate any lingering fungal spores, bacteria, or insect eggs that could cause problems for new seedlings. One simple method is to bake the soil in an oven at 180°F for 30 minutes to kill off harmful organisms. You can also microwave small batches for 90 seconds or drench the soil with boiling water before letting it cool completely. While sterilization may seem like an extra step, it prevents potential problems before they start.
See more about the importance of healthy soil here.

How to Actually Sow Seeds Properly
Sowing seeds might seem like the easiest step, just drop them in the soil, cover them up, and let nature do the rest, right? Not quite. Starting seeds successfully is all about precision, patience, and understanding exactly what your plants need.
First, make sure to read the seed packet. It'll tell you whether to start seeds indoors or plant them directly in the garden, how deep they should be planted, how far apart they need to be, and how long they typically take to germinate. These details make all the difference between strong seedlings and weak, struggling sprouts.
Depth is another critical factor. A general rule of thumb is to plant a seed twice as deep as its diameter, but there are exceptions. Large seeds, like beans, peas, squash, and sunflowers, need to be buried deeper so they can establish strong roots right away. Tiny seeds, like lettuce and petunias, should be pressed onto the surface of the soil since they require light to germinate. If buried too deeply, they may never break through. Lightly misting these surface-planted seeds helps keep them in place while ensuring they make good soil contact.
Some seeds benefit from pre-treatment before planting. If you’ve ever had seeds that take forever to germinate, it might be because they have a hard outer shell that slows moisture absorption. Large seeds like morning glories, nasturtiums, and sweet peas germinate much faster if you nick the outer shell with a file or soak them overnight in warm water. This simple trick allows moisture to penetrate more easily, encouraging faster and more even sprouting.

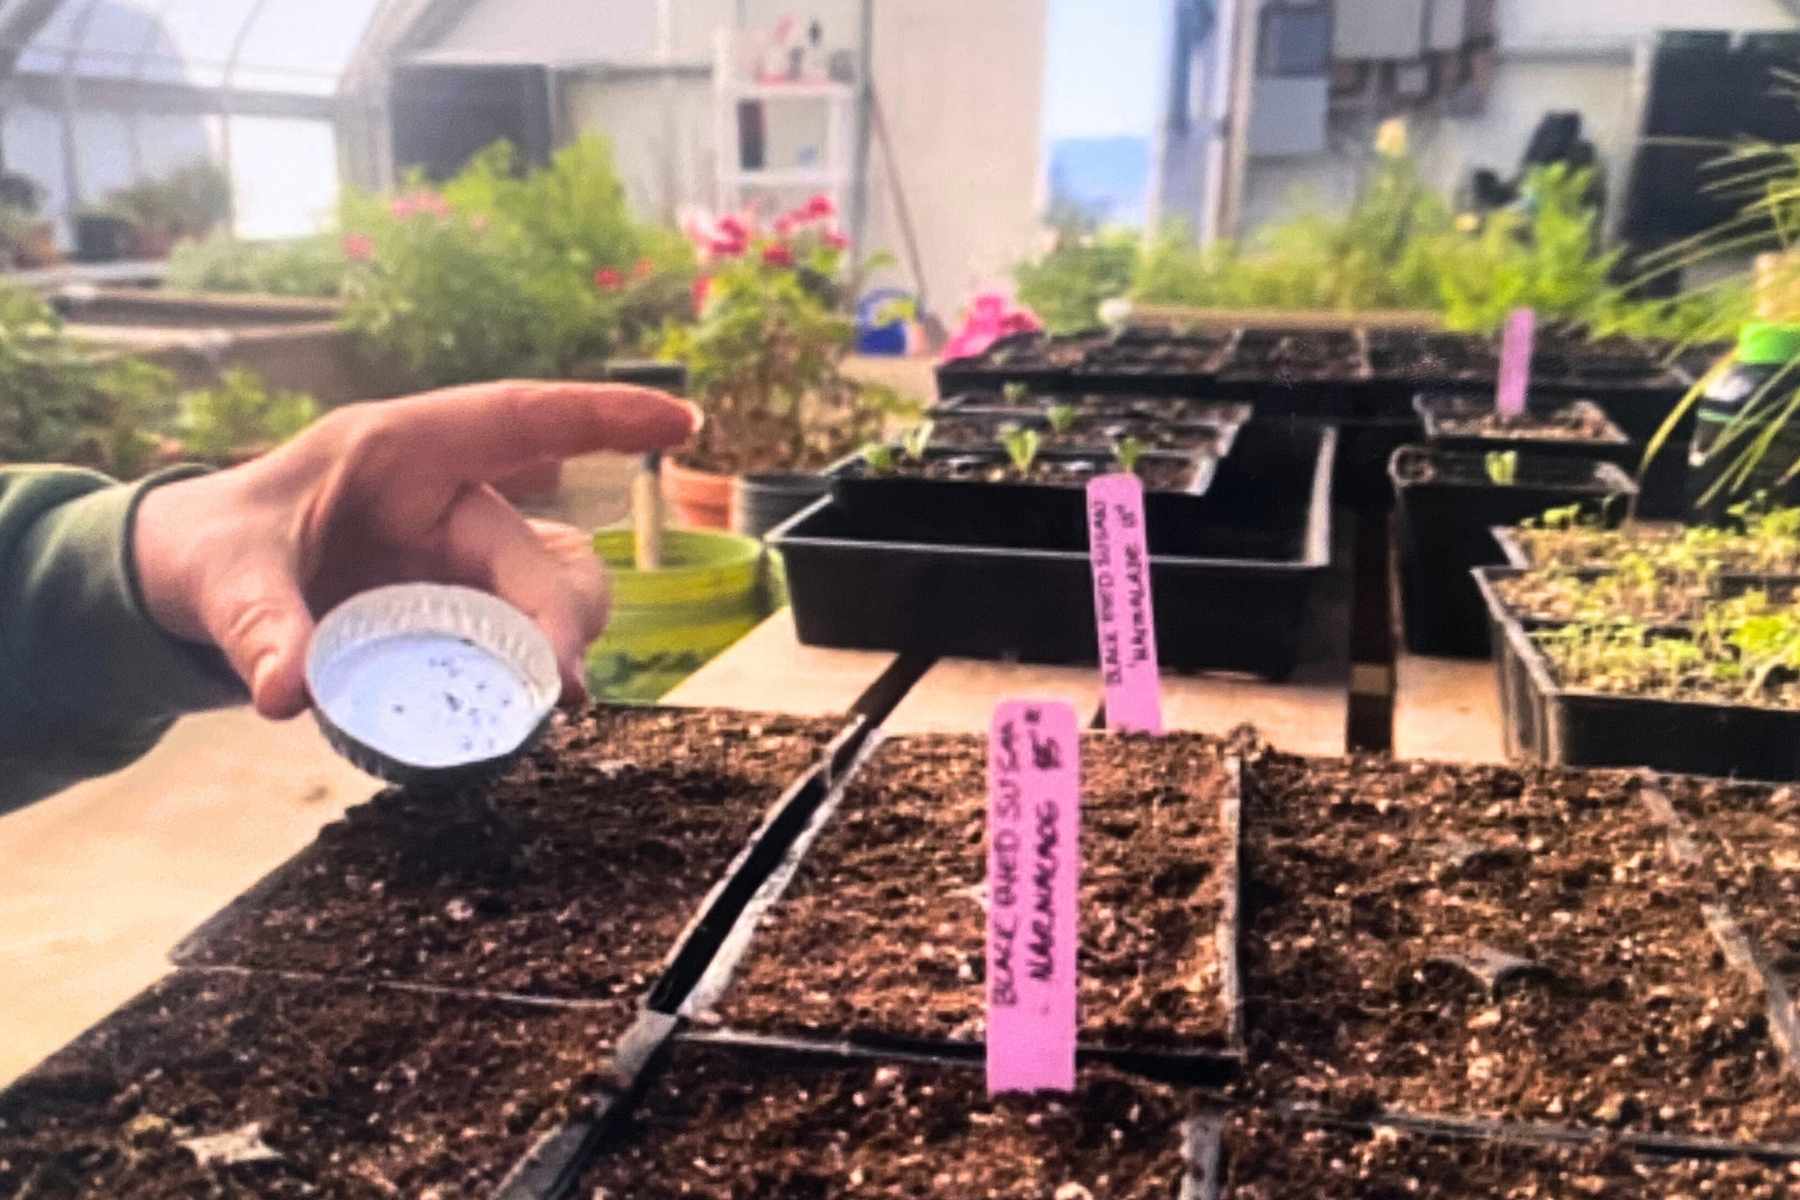
Planting tiny seeds like Black-Eyed Susans can be a delicate and sometimes frustrating process, but a great trick to make it easier is using an anti-static tray along with a moistened toothpick. This simple yet highly effective method allows for precise seed placement, ensuring each seed has enough space to grow properly. By using this technique, you can prevent wasted seeds, reduce overcrowding, and minimize the need for tedious thinning later on.
Start by preparing your seed-starting mix in a tray or container, ensuring it is moist and fluffy. Make small indentations in the soil, about a quarter of an inch deep, using the tip of a pencil or a small tool. Then, grab a toothpick, dampen it slightly, and gently pick up one seed at a time. Place the seed carefully into the hole, wipe the toothpick, re-moisten it, and repeat with the next seed.
For tiny seeds, you can plant two seeds per cell. This will give you a backup if one doesn’t germinate, and if both do, you can easily separate them into two plants later. Using an anti-static tray is particularly helpful because the seeds don’t stick to the tray, making the process smoother. Once the seeds are in place, lightly cover them with soil and gently pat it down to ensure good contact.
Don’t forget to label your tray or six-pack with the plant name, it’s easy to lose track of what you’ve sown!

Watering Seedlings the Right Way
Watering might seem straightforward, but it’s one of the easiest ways to go wrong when growing plants from seed. Too much water, and your delicate seedlings drown. Too little, and they dry out before they’ve had a chance to grow. The key is striking the perfect balance so the soil stays evenly moist but never soggy.
Like we already covered, the best watering method for seedlings is bottom watering, where you pour water into the tray beneath your containers and allow the soil to absorb moisture from below. This keeps the soil surface dry (which helps prevent fungal growth), and encourages deeper root development as seedlings reach downward for water.
If top watering is necessary, use a gentle mist or fine-shower watering can to prevent disturbing delicate seedlings. This is especially important for tiny seeds planted on the surface, like lettuce and snapdragons, which can be easily displaced by heavy streams of water.

Overwatering is one of the most common gardening mistakes. Too much water fills air pockets in the soil, cutting off oxygen to the roots. The result? Yellowing leaves, weak stems, and stunted growth. If seedlings suddenly flop over or look waterlogged, it’s a sign they’re drowning. To avoid this, check moisture levels by sticking your finger about half an inch into the soil, if it still feels damp, wait before adding more water. Dry soil also appears lighter in color, while moist soil remains darker.

On the flip side, letting seedlings dry out can be just as damaging. Unlike mature plants with deep roots that can pull moisture from lower soil layers, young seedlings rely on consistent moisture near the surface. If they dry out completely, their roots can die off before they’ve even had a chance to grow.

Temperature also affects how often seedlings need water. In warmer conditions, the soil dries out faster, while in cooler temperatures, moisture lingers longer. If you’re growing indoors under grow lights, check the soil more frequently, as the warmth from the lights can dry out the top layer faster.
Once seedlings are strong enough to be transplanted into the garden, watering routines change again. Newly transplanted seedlings need extra moisture while they adjust to outdoor conditions, but after they settle in, it’s best to water deeply and less often. This encourages roots to grow deeper into the soil, making them more drought-resistant.

What to Do If Your Seeds Aren’t Germinating
If your seeds aren’t sprouting, the first thing to check is temperature. Some seeds, like lettuce, peas, and spinach, prefer cool soil temperatures (around 50–65°F) and can actually struggle to germinate if conditions are too warm. Others, like tomatoes, peppers, and eggplants, need consistent warmth (70–85°F) to sprout. If the temperature isn’t right, germination can be delayed or fail altogether. Using a seedling heat mat can help warm-loving crops sprout faster, while keeping cool-season seeds in a shaded, cooler area prevents overheating.
The age of the seed matters, too. Even when stored properly, seeds lose viability over time. Some, like onions and parsley, only last a year, while others, like tomatoes and beans, can last four to six years. If your seeds are older, do a simple germination test, place a few seeds on a damp paper towel, fold it over, and seal it in a plastic bag. Leave it in a warm spot and check after a few days. If most of the seeds haven’t germinated, it’s time for fresh ones.
Another common issue? Moisture imbalance. If soil is too dry, seeds won’t germinate. If it’s too wet, they can rot before sprouting. A light misting or bottom watering helps maintain steady moisture without drowning them.

Experimenting with Pepper Seed Germination
Some seeds, like peppers, are notoriously slow and stubborn when it comes to germination. But with a little experimentation, you can improve your success rate. I’ve been testing a method using chamomile tea and a heat mat, and it’s showing promising results.
Here’s how it works: Soak your pepper seeds in chamomile tea water and place them inside a coffee filter. Fold the coffee filter into a small pouch, keep it moist, and then seal it inside a plastic bag. Place the bag on a heat mat to maintain a consistent, warm temperature.
This experiment started three days ago, and already the seeds are sprouting! Chamomile tea is thought to have mild antifungal properties, which can prevent damping off or mold from forming on the seeds. The heat mat speeds up the process by providing the warmth peppers need to break dormancy. If you’ve struggled with germinating peppers in the past, give this method a try!

Do Your Have Leggy Seedlings?
If your seedlings look tall, thin, and stretched out, they’re what gardeners call leggy. This happens when plants don’t get enough light or are exposed to too much warmth too soon. The most common cause is insufficient light. The moment a seedling sprouts, it starts reaching for the nearest light source. If that light is too weak or too far away, the stem stretches too quickly, becoming thin and weak. The best fix? Move your grow lights closer, about 1 to 2 inches above the seedlings, and keep them on for 12 to 16 hours per day. If growing near a window, rotate trays daily to prevent seedlings from bending toward the light. Temperature also plays a big role. If conditions are too warm, seedlings grow too fast and stretch before they can develop strong stems. If you notice excessive stretching, lower the temperature slightly (keeping most seedlings around 60–70°F after germination) to slow their growth and encourage sturdier stems.

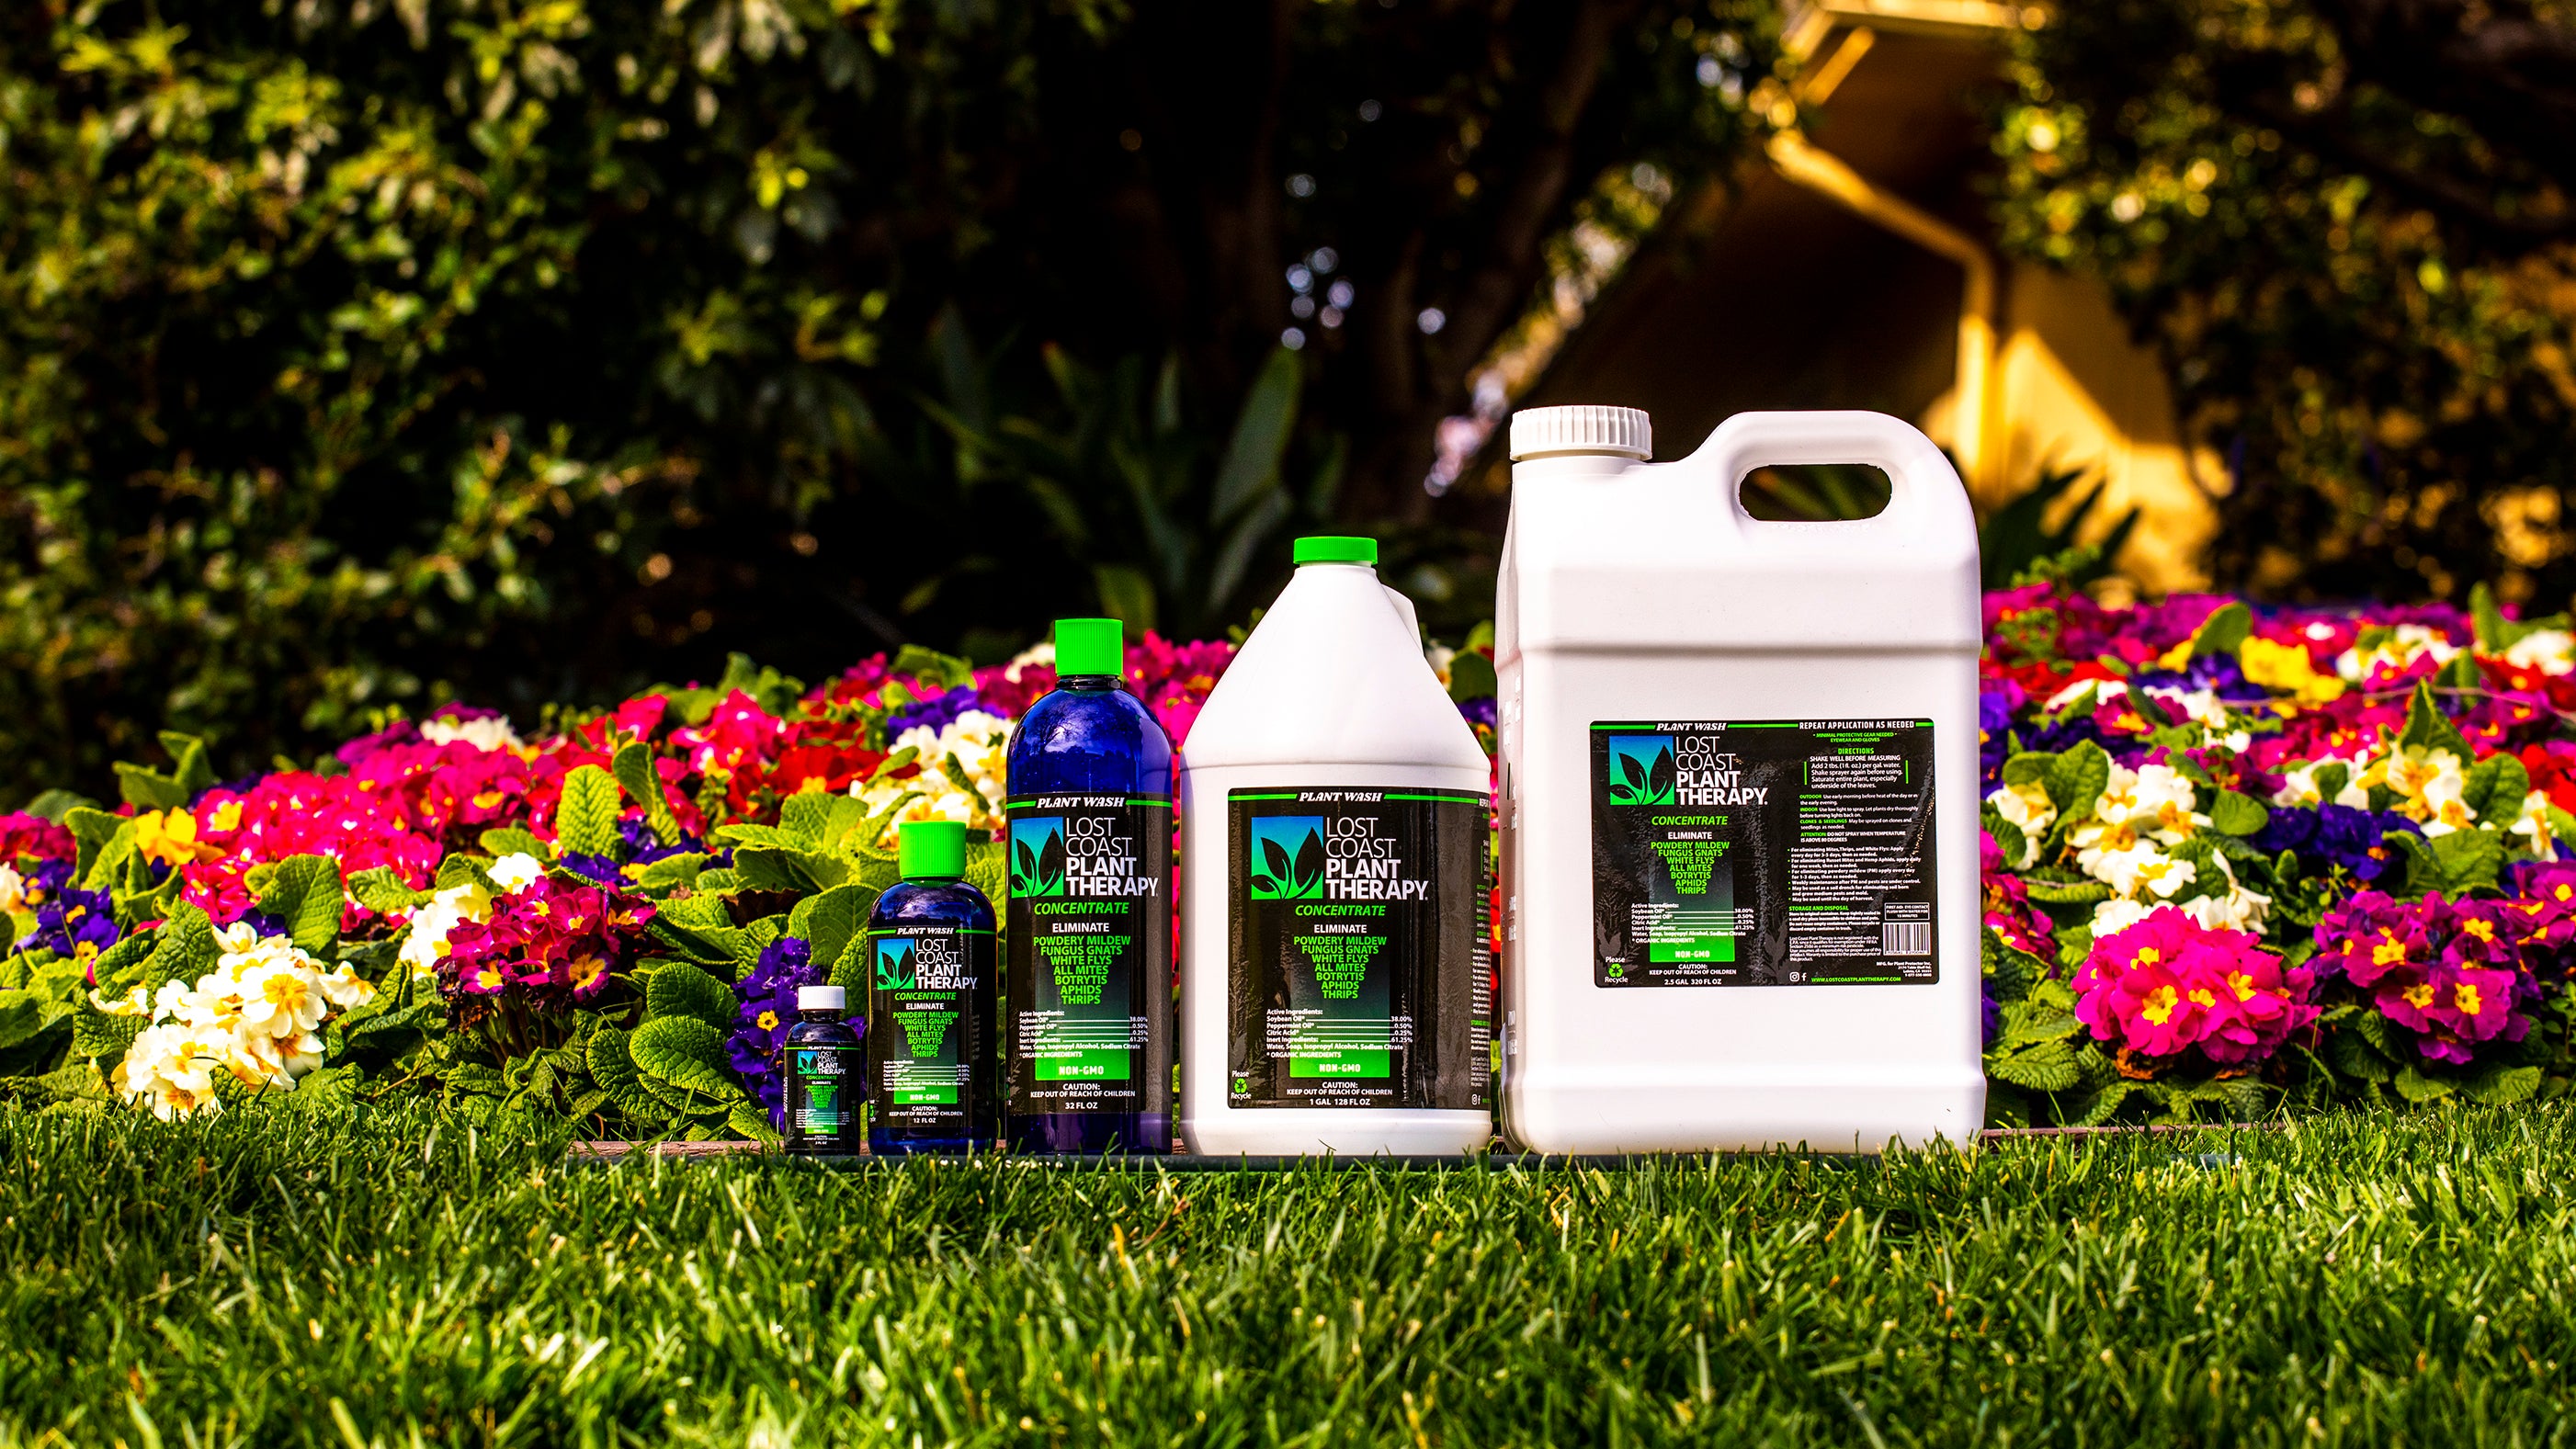
Protecting Seedlings with Lost Coast Plant Therapy
Just like proper watering and lighting, pest management and plant disease control is essential for raising strong, healthy seedlings. Young plants are particularly vulnerable to fungal infections, mold, and soft-bodied pests, which can weaken them or cause sudden losses. Lost Coast Plant Therapy is a minimum risk pesticide that offers a safe and effective way to protect seedlings from the start when used as directed, preventing common issues that arise in warm, humid seed-starting environments.
One of the biggest early threats to seedlings is damping off, a fungal disease that causes young plants to collapse at the soil line. Because Lost Coast Plant Therapy helps control mold and mildew, a light mist on the soil surface before planting seeds, or just as they begin to sprout, can create an environment that discourages fungal spores. Since seedlings are delicate at this stage, a diluted solution (about half-strength) is recommended. Always test on a small batch before applying more broadly.
As seedlings grow and develop their first set of true leaves, they become more susceptible to pests such as fungus gnats, aphids, and thrips, which can quickly stunt their growth. A light foliar spray of a natural and organic pesticide like Lost Coast Plant Therapy at this stage helps protect against these common garden pests without harming tender seedlings.

Hardening Off: Avoiding Transplant Shock
Seedlings that have been carefully nurtured indoors are a lot like houseplants, they’re used to a controlled environment. No wind. No harsh sun. No unexpected cold snaps. If you suddenly move them outside without preparation, it’s like tossing someone from a cozy, climate-controlled home straight into a storm. The result? Transplant shock, a stressful adjustment period where seedlings can wilt, stop growing, or even die.
That’s where hardening off comes in. It’s the process of gradually exposing seedlings to outdoor conditions so they can adapt before being planted in the garden. This simple step makes all the difference between strong, resilient plants and ones that struggle to survive.
The best time to start hardening off seedlings is about one to two weeks before transplanting them into the garden. If you can, choose a warm, calm day for their first outing. Start small, place them outside for just an hour in a shady, sheltered spot. No direct sun, no wind. This brief exposure helps them adjust without overwhelming them.
Each day, increase their time outdoors by one to two hours, gradually introducing them to morning sunlight while still protecting them from harsh midday heat and strong wind. Over time, expose them to longer periods of sun, fluctuating temperatures, and even light breezes. By the end of the hardening-off process, they should be able to handle full days outside without wilting or showing signs of stress.

One mistake many gardeners make is rushing the process. It’s tempting to move seedlings outside permanently after just a few days, but they need time to develop thicker cell walls and stronger stems to handle outdoor conditions. If you skip hardening off, they may suffer from sunscald (leaves that turn white from sun damage), windburn, or stunted growth.
If nights are still chilly, bring the seedlings back indoors or cover them with a lightweight row cover to keep them from getting too cold. Many warm-season crops, like tomatoes, peppers, and squash, should never be transplanted until after the last frost, as even one cold night can permanently damage them.
You’ll know your seedlings are ready when they look strong, stocky, and unfazed by a light breeze or gentle rain. At this point, they can be planted in the garden without major setbacks.

Transplanting Seedlings into the Garden
Once seedlings are fully hardened off, they’re ready for the garden. Transplanting on a cloudy day or in the late afternoon helps reduce stress, and giving seedlings a good drink beforehand ensures they don’t dry out. Most plants should be planted at the same depth they grew in their containers, except tomatoes, which can be buried deeper to develop stronger roots. After planting, water thoroughly and keep an eye on them for the first few days as they adjust to their new environment.

Conclusion
No matter how much experience you have, seed planting is always a learning process. Every gardener, no matter how skilled, has faced failed germination, leggy seedlings, or a tray of sprouts that looked healthy one day and collapsed the next.
Some seasons will test your patience. Maybe you’ll forget to water for a day too long, or an unexpected cold snap will wipe out your newly transplanted seedlings. But every challenge makes you a better gardener. You learn to observe, adjust, and understand what your plants need, sometimes before they even show signs of struggle.
The best advice? Keep experimenting. Try different seed-starting mixes, tweak your watering routine, and embrace the failures as much as the successes. The more you pay attention, the more intuitive it becomes. And before you know it, you’ll be growing healthy, vigorous plants with confidence, ones that will fill your garden with fresh food, vibrant flowers, and the deep satisfaction of knowing you grew them from nothing more than a tiny seed.

FAQ's
What are the steps for seed starting?
The first step for seed starting is selecting a high-quality seed starting mix, as regular garden soil is too heavy and can introduce weed seeds and disease. Next, seeds are planted in a seed starting container, such as seed trays, soil blocks, or biodegradable pots, ensuring they have enough space to grow. Moistening the soil before planting helps seeds settle in, and reading a seed packet is essential to determine the correct planting depth. Most seeds require warmth to germinate, so placing them on a seedling heat mat or in a warm spot is recommended. A humidity dome can be used to maintain consistent moisture levels, but once seeds have germinated, it should be removed to prevent fungal growth.

What type of container is best for seed starting?
A seed starting container should have good drainage and provide enough space for roots to grow. Seed trays with individual cells help organize seedlings and make transplanting easier. Biodegradable pots are an excellent choice since they can be planted directly in the soil, reducing transplant shock. Soil blocks eliminate the need for containers altogether, encouraging strong root development without the risk of root binding. Recycled containers like yogurt cups can be used for to start your seeds as long as drainage holes are added. The right container depends on the gardener's preference and the type of seed being grown.

How do you ensure seeds germinate successfully?
To help seeds germinate, it is essential to provide the right moisture, warmth, and air circulation. A seed starting mix keeps seeds evenly moist while ensuring good aeration and drainage. Most seeds require temperatures between 65-75°F to sprout, and using a seedling heat mat can speed up the process for warmth-loving plants. A humidity dome can help retain moisture, but once seeds have germinated, it should be removed to prevent mold growth. Proper airflow is also necessary to keep fungal issues at bay, and using a small fan can strengthen seedlings by mimicking outdoor conditions.

How do you know when seeds have germinated?
Once seeds have germinated, tiny sprouts will emerge from the soil, often with their first set of leaves. At this stage, seedlings need adequate light to grow strong and prevent them from becoming leggy. If seeds were started under a humidity dome, it should be removed to allow fresh air circulation. Keeping the soil consistently moist but not overly wet ensures continued growth. The time it takes for seeds to germinate varies based on the type of seed, and reading a seed packet can give an estimated germination timeline.

How do you collect and store seeds for future planting?
To collect seeds, gardeners should wait until the plant has fully matured and the seed heads have dried. Seeds should be carefully removed, cleaned, and stored in a cool, dry place. Labeling seed packets with the plant name and collection date helps keep track of viability. Most seeds can be stored for several years if kept in an airtight container in a dry environment. Proper storage ensures that seeds remain viable and can be used for starting new plants in future seasons.
See more FAQ's here.

Additional Resources
Hardening Off Vegetable Seedlings for the Home Garden - University of Maryland Extension
Hardening Transplants - Penn State Extension
Hardening off vegetable transplants is easy! - Michigan State University Extension
Starting a Garden: Hardening Off Indoor Seedlings - Illinois Extension
Starting seeds indoors - University of Minnesota Extension
Starting Plants from Seed for the Home Gardener - University of Georgia Extension
Seed Starting Demystified - Penn State Extension
Seed Starting Basics - University of New Hampshire Extension
Hardening Transplants - University of Nebraska-Lincoln Extension in Lancaster County
Selecting, Hardening, and Planting Bedding Plants - Iowa State University Extension
Using Transplants in the Garden - West Virginia University Extension